
Beyond fixing leaks and teaching kids how to use less water, how can we reduce our everyday “water footprint”? The yard is a great place to start, and compost is one of the most useful tools available to gardeners.
Unfortunately, compost seems to be wrapped in mystique. A common misconception is that compost is smelly stuff found in animal barns or garbage bins. Another myth is that it takes precise recipes, special starters, or a biochemistry background to make good compost. In reality, composting is simply the managed, natural process of breaking down organic materials into a soil amendment that plants and soil organisms can use. Done properly, making compost can be clean, healthy, and thrifty, too.
Whether you make it at home or purchase it, finished compost helps improve the condition of soil and can make better use of rainfall and irrigation. Composting also puts leaves, grass clippings, and many kitchen scraps to work instead of sending them to the landfill.
The following sections explain how compost and mulch work, what materials to use, how to manage a compost pile, and how schools or community groups can demonstrate the process.
Landscape Mulch
One of the best methods of growing healthy plants and conserving water at the same time is to use mulch in the landscape. Experienced gardeners have long known the secret of mulching the garden and all its benefits.
What is mulch? It is simply a protective ground covering that can save water, reduce evaporation and erosion, discourage weeds, and—in the case of organic mulches—add organic matter to the soil as it breaks down. Almost sounds too good to be true!
Mulches can be classified as organic or inorganic. Organic mulches include straw, leaves, bark, pine needles, compost, and similar materials. Inorganic mulches include rocks, gravel, and other non-plant materials.
A big advantage of mulching is that it reduces moisture loss from the soil surface. Mulch also shields the soil from drying winds and direct sunlight. Its insulating quality helps moderate soil temperatures through Southeast Texas summers and winters. More consistent moisture and temperatures support healthy roots and plant growth.
Erosion control is important, especially on sloping ground. Mulch softens the impact of heavy rain and can reduce soil splash and runoff. It also suppresses many weeds by blocking sunlight from reaching the soil.
For most landscape beds, start with approximately 2 to 3 inches of organic mulch and replenish it as needed. Keep mulch a few inches away from tree trunks and the stems or crowns of plants. Around trees and shrubs, think of a doughnut rather than a mound piled against the trunk.
Another benefit of organic mulch is that it contributes organic matter as it decomposes. And, of course, mulch has aesthetic value. There are many colors and textures, and a consistent layer can give the garden floor much the same finished appearance as a carpet in a home.
So What Are Some of These Marvelous Mulches?
Bark
One of the most popular and widely available mulches. Shredded or chipped bark can be purchased in bags or in bulk. It is relatively easy to apply, although lighter pieces may float or wash away during heavy rains.
Chipper Debris
A mixture of shredded bark, wood chips, and leaves from tree-trimming operations. Its less-uniform appearance creates a rustic effect in outlying areas of the yard where fine texture may not be important. Fresh woody material is generally best left on the soil surface as mulch rather than mixed deeply into planting soil, where decomposition can temporarily compete with plants for nitrogen.
Partially Decomposed Compost
A useful organic mulch, particularly in beds where improving the soil is a goal. You can make your own or purchase it. Its less-uniform appearance may be a drawback in some prominent areas, and unfinished compost may contain viable weed seeds.
Leaves
Readily available and inexpensive. Leaves usually work best when shredded before they are spread. Thick layers of large, whole leaves can mat together and interfere with the movement of water and air.
Pine Needles
An attractive, long-lasting mulch that can be especially useful on slopes. Contrary to a common gardening myth, pine needles do not ordinarily make the soil significantly more acidic as they decompose. As with other dry organic material, keep them away from open flames and other ignition sources.
Inorganic Mulches
River stones, pebbles, and gravel chips can be striking when used thoughtfully in the landscape. They will not improve the soil as organic materials do and can absorb and reflect heat. Fallen leaves and other debris may also be difficult to remove from gravel beds.
Landscape Fabrics
Permeable fabrics can sometimes help with weed control, especially beneath gravel or stone. They should be used selectively: weeds can eventually grow into the material, and fabric beneath organic mulch may make future soil improvement and bed maintenance more difficult. Do not cover planting beds with solid plastic that prevents normal movement of air and water.
Some fresh, high-carbon materials, particularly sawdust and finely shredded wood mixed into soil, can temporarily tie up nitrogen as microorganisms break them down. This is less of a concern when coarse wood chips are used as a surface mulch around established plants. Choose the material and application method to suit the plants and soil.
Organic mulches gradually decompose and will need replenishing. Check the garden periodically, loosen any matted layer, and add enough fresh material to restore the desired depth. There is usually no need to remove the older mulch first; soil organisms can continue breaking it down.
How Does Compost Protect Water?
If compost seems in any way mystical, it may be because of the good work it does in soil. In heavy clay soils, compost can improve soil structure and help rainwater soak in rather than run off. In sandy soils, compost adds organic matter that helps the soil retain moisture and nutrients. These benefits can support healthier plants while reducing unnecessary watering. The results vary with the soil and the amount and quality of compost applied.
Compost supports the organisms that make soil healthy and helps nutrients become available to plants over time. By improving soil structure and plant growth, it can help address water conservation, erosion, stormwater runoff, and the amount of organic material discarded as waste.
Adding mature compost to planting beds—and using suitable amounts as a topdressing for established lawns—can increase soil organic matter and improve the movement and retention of water. Better infiltration helps reduce runoff, and less exposed soil means less erosion and sediment entering storm drains.
Healthy soil may also reduce the need for some supplemental fertilizers, but compost is not a substitute for understanding a plant’s nutrient needs. Test soil when appropriate and apply fertilizers carefully so excess nutrients do not wash into waterways.
Look at the bags of leaves and yard trimmings set beside the curb in many neighborhoods. Much of that material is a valuable resource that could be recycled at home. Turning it into compost is one way to give lawns, trees, and gardens a helping hand while keeping useful organic matter out of the waste stream.
Designing and Building a Compost Demonstration
Homeowners often express interest in composting, but hesitate because they imagine a bulky, unattractive pile that is difficult to manage. In fact, a composter can be as small as a storage bin or as elaborate as a multi-bin system. The equipment can be scaled to fit the organic material available, the space, and the time someone wants to invest.
For schools, garden clubs, parks, water utilities, and other community organizations, a compost demonstration can help take the mystery out of the process. Visitors can see different types of composters, observe how materials break down, and learn how compost benefits soil and water conservation. This is an educational option—not a description of an existing WHCRWA demonstration facility.
Ideally, a demonstration should be close to a source of compostable material and to landscaping where the finished compost can be used. It might be part of a water-wise demonstration garden, a schoolyard project, or a community garden. Informational signs and take-home materials can explain what belongs in the bin, how to balance materials, and how to recognize finished compost.
Good access matters. A stable path allows visitors to approach the bins, while space for a wheelbarrow makes maintenance easier. A nearby water source is helpful for maintaining proper moisture. A pile can be located in sun or shade; in Southeast Texas, partial shade may make it more comfortable to work and help reduce drying.
Although composters can be simple structures, sturdy construction helps a public demonstration look attractive and remain usable for years. Use weather-resistant materials and allow adequate ventilation and drainage. Avoid placing a bin where runoff from the pile could flow directly into a storm drain or waterway.
There are several practical options to demonstrate:
- Two-bin system: Two adjoining bins, each roughly 3 feet wide, 3 feet deep, and 3 feet high, give room to collect materials in one bin and turn or finish compost in the other. A bin of these dimensions holds about 27 cubic feet, or 1 cubic yard. Sturdy wire or slatted sides allow airflow, and a base in contact with the ground provides drainage.
- Purchased bins and tumblers: Enclosed plastic bins or rotating containers can fit small yards and patios. Tumblers are convenient for mixing materials, although smaller volumes may not reach the high temperatures of a large, actively managed pile. Compost starter products are generally unnecessary; the microorganisms needed for decomposition occur naturally on organic materials.
- Small-space composting: A small container with drainage and air circulation can handle limited amounts of leaves and vegetable scraps. Smaller systems tend to compost more slowly and need careful attention to moisture and odors, but they can still be useful for households with little outdoor space.
- Worm composting: Also called vermicomposting, this approach uses composting worms, commonly red wigglers (Eisenia fetida), to process suitable kitchen scraps and bedding. A ventilated, drained bin kept in a cool, shaded location can work well. Worms do best in moderate temperatures and should be protected from the intense heat of a Texas summer and from freezing conditions.
Worm bins can process small amounts of fruit and vegetable scraps, coffee grounds, and shredded plain paper. Cover new food with bedding and avoid overfeeding. Composting worms are different from the earthworms commonly found deeper in garden soil; they thrive in moist, organic-rich material near the surface.
A school or community demonstration also creates opportunities for students to observe insects, worms, fungi, and the many organisms involved in returning nutrients to the soil. The project can be as simple or as ambitious as its caretakers can realistically maintain.
How Is Compost Made?
There are many books and online resources describing composting techniques, from simple backyard bins to commercial systems. But basic home composting does not require a sophisticated recipe. It is true that composting is part art and part science, and that gardeners become more skillful with practice. A few general principles, however, will turn commonly available organic waste into dark, crumbly material.
Many organic materials can be composted, including shrub trimmings, autumn leaves, spent garden plants, grass clippings, vegetable scraps, and plain shredded paper. Some people believe that excellent compost requires horse, cow, or chicken manure. It does not. Manure can be used in properly managed systems, but it introduces extra handling and safety considerations and is not necessary for a backyard compost pile.
The keys are straightforward: adequate moisture, a reasonable balance of nitrogen-rich and carbon-rich materials, enough oxygen, and time.
Bacteria, fungi, and other decomposers do the work. They need a damp—but not waterlogged—environment. A pile that becomes too wet and compacted can lose oxygen and develop unpleasant odors. A properly managed pile should smell earthy as it matures, not rotten. An ammonia smell is often a sign of too much nitrogen-rich material or insufficient airflow.
Green Versus Brown
Composters commonly divide their ingredients into two groups: greens and browns. These labels describe the materials’ roles in decomposition, not necessarily their visible colors.
Green materials, such as fresh grass clippings, vegetable scraps, and coffee grounds, are relatively rich in nitrogen. They tend to decompose quickly. Brown materials, such as dry leaves, shredded cardboard, and small woody pieces, provide carbon and help keep the pile from becoming dense and soggy.
Greens and browns can break down separately, but a mix usually works better. A pile made almost entirely of fresh grass clippings may become wet and smelly; a pile made almost entirely of dry leaves may decompose very slowly. A balance of the two provides food for microorganisms and spaces for air.
A useful starting point is approximately two to three parts browns to one part greens by volume. The exact mix will vary with how wet, dense, or finely chopped the materials are. You can build the pile in loose layers or mix materials before adding them.
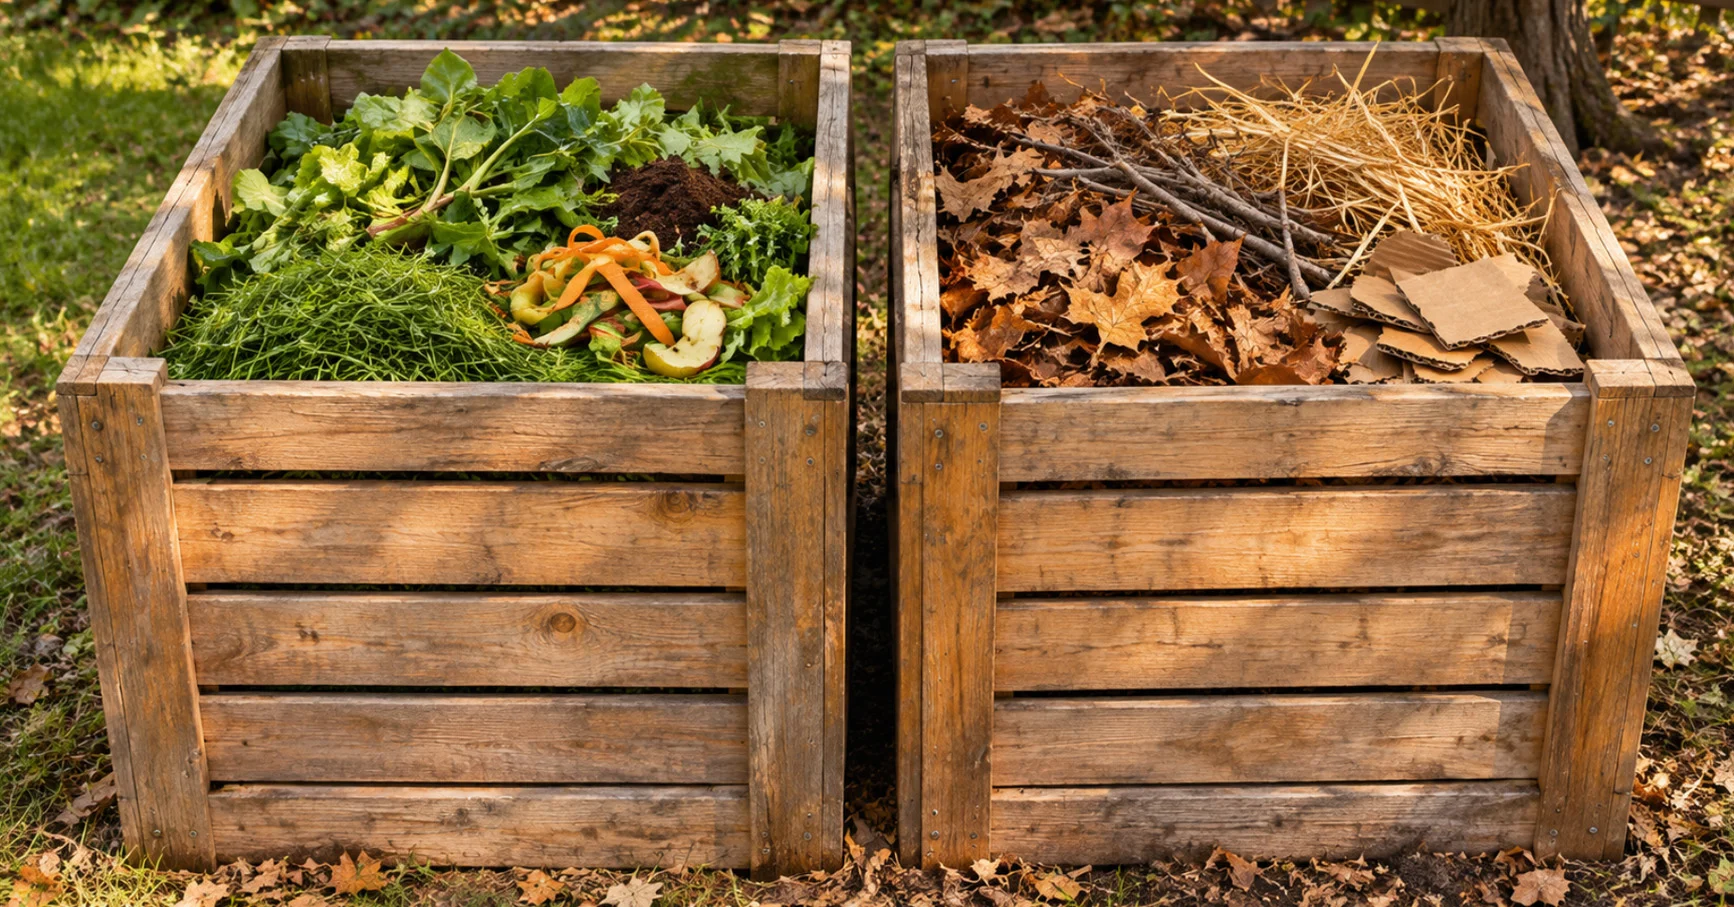
| GREEN – HIGH NITROGEN | BROWN – HIGH CARBON | VERY BROWN – HIGHEST CARBON |
|---|---|---|
| Fruit and vegetable scraps | Dry leaves | Paper (roughly shredded) |
| Grass clippings Green weeds (no seeds) Coffee grounds |
Dry straw or hay (no seeds) Shrub prunings Dead plants (not diseased) |
Paper egg cartons Untreated sawdust Untreated wood chips |
Materials with high carbon content help maintain a loose structure, but very woody pieces break down more slowly. Cut or shred bulky ingredients where practical, and avoid compacting the pile.
Water the materials as they are added until the pile feels like a wrung-out sponge—moist but not dripping. Check moisture occasionally, especially during prolonged dry weather. If the pile smells like ammonia, add more browns and mix it. If it is dry and decomposition has slowed, add a little water. If it is wet and foul-smelling, add dry browns and improve airflow.
Composting does not require a sunny location. The heat in an active pile is produced by microorganisms as they break down organic material, not by sunlight shining on the bin. A shady spot can be particularly useful in Southeast Texas because it helps reduce drying and makes the work more pleasant.
Turning a pile mixes materials, breaks up compacted clumps, redistributes moisture, and introduces air. The oxygen is gradually consumed again, so a loose structure that permits ongoing airflow is important between turns.
Hot Versus Cold Compost
As bacteria and fungi break down organic material, they release heat. The faster a well-balanced pile decomposes, the warmer it may become. Anyone who has picked up a pile of fresh grass clippings after a day or two has probably noticed the heat that can develop.
Hot composting uses a relatively large pile, a good balance of greens and browns, proper moisture, and enough oxygen to support rapid decomposition. A pile about 3 feet on each side is a common starting size for retaining heat. Turning can move cooler outside materials toward the warmer center and keep the process active.
Properly managed hot composting can reduce many weed seeds and disease-causing organisms, but high temperature by itself is not a guarantee. The pile must remain hot long enough, and all materials—including the outer portions—must be exposed to the necessary conditions. Most backyard piles should not be assumed to have sanitized everything placed in them.
Cold composting is less demanding. Materials are added as they become available, and the pile decomposes gradually with less turning and monitoring. It generally takes longer—often many months or more—but can be perfectly suitable for routine yard and garden scraps.
The trade-off is time and temperature. Because cold piles do not reliably destroy weed seeds or plant pathogens, keep seed-bearing weeds, diseased plants, and other problem materials out of them. Whether composting hot or cold, the finished material should be dark, crumbly, and earthy-smelling, with the original ingredients mostly unrecognizable.
Do Not Compost!
Some materials attract pests, introduce contaminants, or spread weeds and disease. Keep the following out of an ordinary backyard compost pile:
- Dog, cat, or human waste and used cat litter
- Meat, fish, bones, dairy products, fats, and greasy food
- Weeds with mature seed heads and aggressive weeds that spread by roots or rhizomes
- Diseased or heavily pest-infested plants
- Plants and grass clippings treated with herbicides when the product label or treatment history makes them unsuitable for composting
- Painted or chemically treated wood, plastic, glossy paper, and other non-compostable materials
Caution — Herbicides in Compost
Many substances break down during composting, but not all herbicides do so quickly. A few products used on pastures, hayfields, and other commercial landscapes contain active ingredients that can remain in grass clippings, hay, straw, or manure and later injure sensitive garden plants.
Particular concerns include the persistent broadleaf herbicides aminopyralid, clopyralid, and picloram. Residues of these chemicals may survive composting and damage tomatoes, beans, peas, flowers, and other broadleaf plants. The risk depends on the products used and the source of the organic material.
Be cautious about accepting hay, manure, lawn clippings, or other organic matter from an unfamiliar source. Ask whether the material was treated, and read the pesticide label for restrictions on composting or reuse. If contamination is suspected, do not use the material in sensitive planting beds. A simple plant bioassay using beans or peas can help reveal possible herbicide injury; your county AgriLife Extension office can provide guidance.
The important lesson is not to memorize a long list of product names or outdated estimates of how many days a chemical takes to degrade. It is to know the source of your materials, follow current labels, and keep questionable material out of the compost pile.
Homemade or Purchased?
Composting considerably reduces the volume of leaves, grass clippings, and kitchen scraps as they break down. What begins as a large pile eventually becomes a much smaller amount of dark organic material.
Homemade compost can be an excellent product, especially when you know exactly what went into it. But it is not automatically better than purchased compost. Quality depends on the ingredients, how the material was processed, and whether it has matured properly.
Few homeowners produce enough compost to amend every planting bed or lawn area on their property. Others may prefer not to compost at home. In either case, a well-made commercial product can be useful.
The quality of bagged and bulk compost varies. Look for material that is dark, crumbly, and has a pleasant earthy smell. It should not smell rotten or strongly of ammonia, and the original ingredients should be mostly broken down. Ask suppliers about the source of their materials and any testing for maturity or contaminants, particularly if compost will be used in a vegetable garden.
Whether homemade or purchased, finished compost is a way to recycle organic matter, support healthy soil, and make better use of the water nature provides.
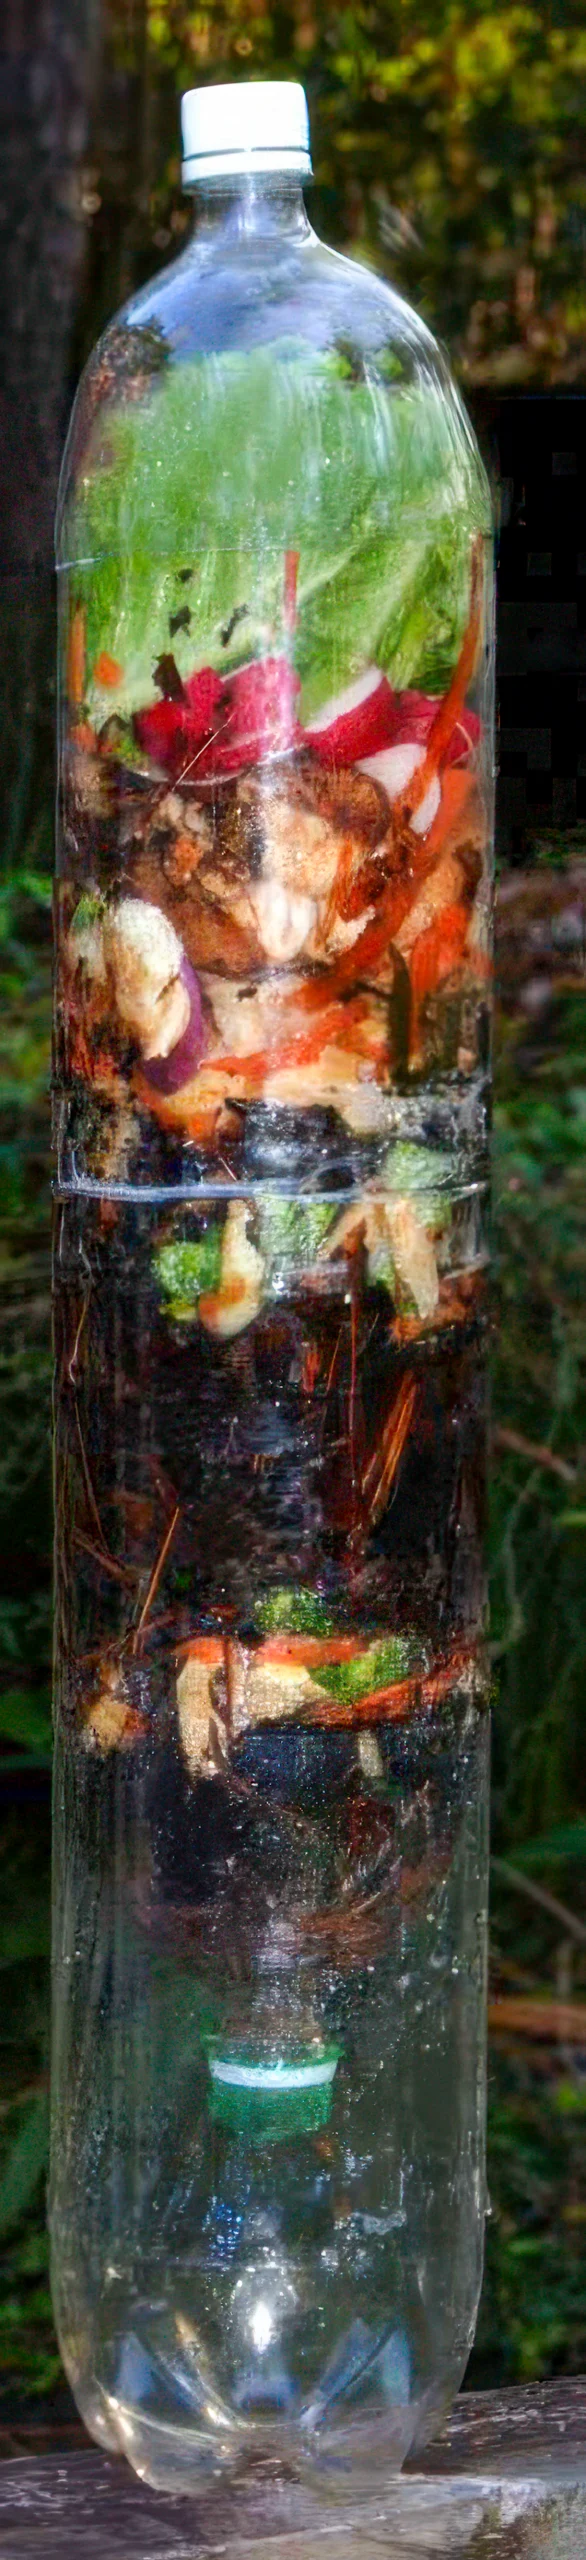
Bottle Biology — Building a Compost Column
Here’s a hands-on way to observe decomposition using recycled plastic bottles. It can make a useful classroom or family science project. An adult should handle cutting tools and prepare the bottle sections before children begin assembling the column.
Materials
- Three clean 2-liter plastic bottles
- One approximately 1½-inch square piece of plastic mesh from a produce bag
- Scissors, a craft knife, a marker, and a small punch or other tool for making air holes (adult use)
- Tape for stability, if needed
- Small amounts of dry leaves, plain shredded paper, and fruit or vegetable scraps for observation
Prepare the Bottles
- Remove the labels, clean the bottles, and designate them A, B, and C.
- Cut the top off bottle A approximately 3 inches below the neck. Mark the top portion #1 and the bottom portion #2.
- Cut bottle B just above the shoulder and just above the base, retaining the center cylinder. Mark that center section #3; the top and bottom pieces will not be used.
- Cut bottle C approximately 2½ to 3 inches above its base. Keep the upper portion and mark it #4; the bottom will not be used.
Assemble the Column
- Remove the cap from section #4 and secure the plastic mesh over its neck opening so material stays in the column while excess moisture can drain.
- Invert section #4 into base section #2, which will catch any drainage.
- Stack the center cylinder, section #3, onto section #4. Tape the connection if needed for stability.
- Have an adult make several small air holes in sections #3 and #4.
- Set top section #1 over section #3 as a loose cover that can be removed for observation and ventilation. Do not seal the column airtight.
Observe Decomposition
Add loose layers of shredded dry leaves or paper and small pieces of suitable fruit or vegetable scraps. Moisten lightly; the materials should be damp, not soaked. Place the column on a stable surface away from direct, intense sunlight, and check it regularly.
Watch for changes in color, texture, moisture, and volume as the materials break down. Record your observations over several weeks. The small size of this project means it may not produce fully finished compost quickly, but it provides an excellent close-up view of decomposition at work.
Wash hands after handling the materials, keep the project away from food-preparation areas, and do not use the collected drainage liquid on edible plants.
Sources and Additional Reading
- U.S. Environmental Protection Agency — Composting at Home
- U.S. Environmental Protection Agency — Benefits of Using Compost
- Oregon State University Extension — Hot Composting and Troubleshooting
- University of Minnesota Extension — Persistent Herbicides and Compost
- Texas A&M AgriLife Extension — Mulching
Content adapted from WHCRWA Water U educational materials. Updated November 2026.

Learn About Your Water!
Practical Information, conservation tips, and educational resources.